How to Use 23Bloom: The Curve, the Bands and the Monitoring
What every 23Bloom control does — Input, Curve, Effect, Clip, the three-band split, loudness tracking and Response — plus Level Match, Delta and Solo, and which presets to start from.
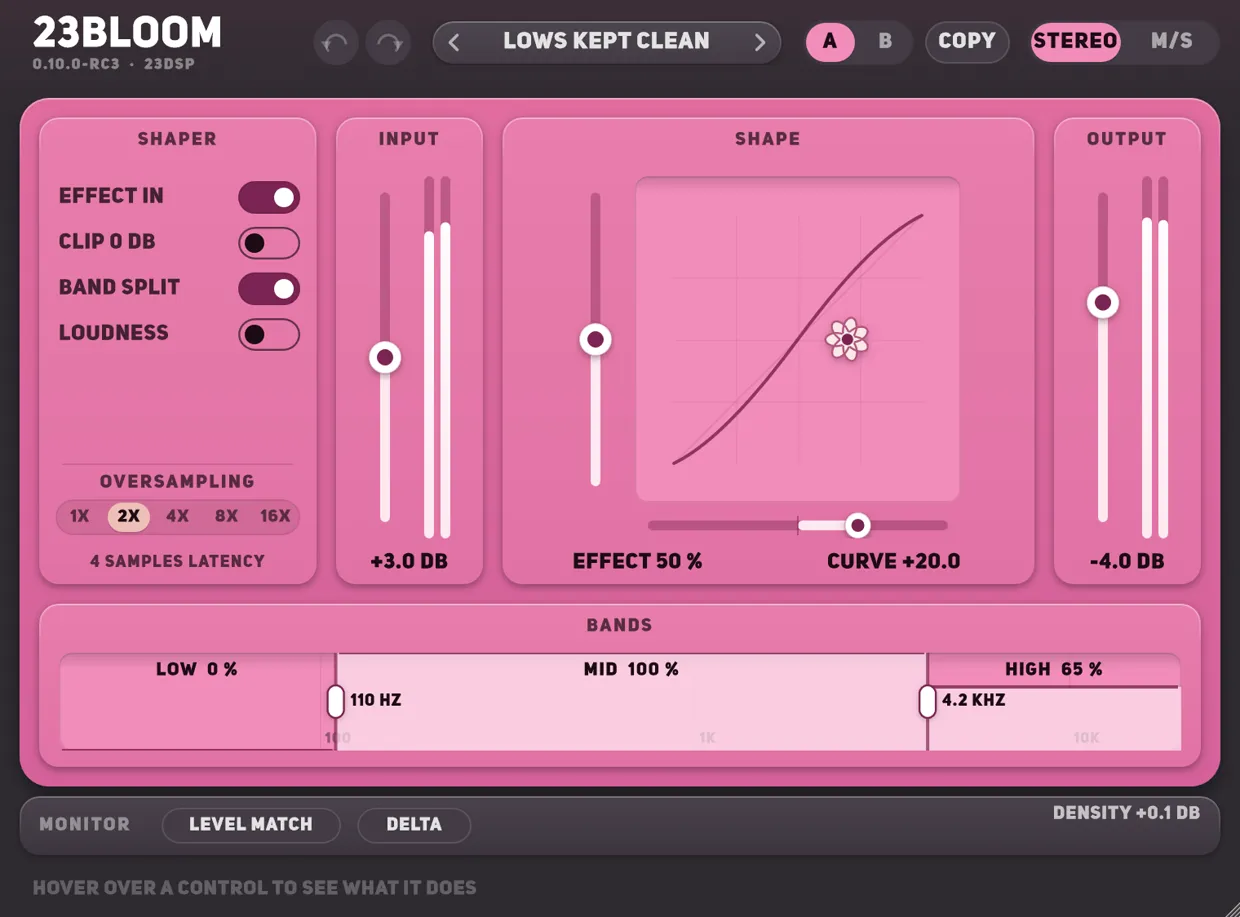
23Bloom is a shaper, a three-band split and a set of monitoring tools. This guide goes through what each control does, how to set it up from nothing, how the band split and loudness tracking change the job, and which presets to reach for first.
Key takeaways
- The curve only does something to signal that reaches it. If a preset seems to do nothing, the track is too quiet — raise Input before you raise anything else.
- Clip holds the input at 0 dB instead of 2, which is the difference between soft harmonics and a hard edge.
- The band split is where the mix-bus work happens: let the low end through and shape the rest.
- Turn Level Match on before you judge anything. Louder always sounds better.
- It is not a limiter. It does not hold peaks down, so follow it with one if they have to be held.
The signal path
Input drives the signal, Clip catches it at 0 dB or at 2, the shaper applies the curve, Effect blends the result against the dry signal, and Output trims what leaves. With the band split on, the shaping happens three times — once per band — and the bands are summed afterwards.
The shaper
Input
Up to 12 dB of drive, and the most important control in the plug-in. The transfer curve is close to a straight line at low level and bends as the signal approaches full scale, so a quiet track gets almost nothing out of 23Bloom until you drive it. If a preset sounds like a bypass, this is why. Most of the factory presets drive between 3 and 9 dB and trim the same amount back at the output.
Curve
From −50 to +50, and it sets the shape rather than the amount.
- Zero is the plain curve: it lifts the quiet detail and holds the loud parts under full scale.
- Negative is softer. It lifts quiet detail less, which suits a drum bus where you want the body without the room coming up with it.
- Positive is firmer and audibly saturated. Past about +30 you are hearing harmonics rather than density.
The XY pad draws the curve as you drag it, with the curve the signal is actually hitting over the top of it while audio plays.
Effect
The blend between the shaped signal and the dry one, 0 to 100 %. Half of a firm curve and all of a soft one are different sounds, not two routes to the same place — try both.
Clip
Off, the input is held at twice full scale, which is where the curve’s fold lands. On, it is held at 0 dB, so peaks are clipped before they reach the shaper. Soft harmonics against a hard edge. On drums the clip is usually the point; on a mix bus it is usually not.
Output
Down to −12 dB of trim. Drive in, trim out: that is how the presets keep a hot mix under full scale.
The three bands
Switch Band Split on and the signal is divided by two Linkwitz-Riley crossovers, shaped band by band, and summed. Both crossovers are controls — the lower from 60 to 800 Hz, the upper from 1 to 10 kHz — and each band has an Amount from 0 to 100 % that scales how much of the shaping it takes. Drag the dividers, or the band heights, in the display.
The useful move on a mix bus is to pull the low band to zero. The bass passes exactly as it was while the mids and highs take the curve, so you get the density without the low end turning to mush. Try the lower crossover around 100 Hz for that.
The three bands add back to the input exactly — it is the Oxford Inflator’s own split — so a band split with nothing shaping passes the signal through unchanged. You can leave it on while you set everything else up.
Loudness tracking
Switch Loudness on and the programme level moves the Curve control. A positive Amount firms the curve up as the music gets louder; a negative one softens it. The detector is K-weighted — a high-pass at 100 Hz, a 4 dB bell at 2 kHz, a low-pass at 8 kHz — so it follows what you hear rather than the waveform.
Response sets how it lets go, and it matters more than the Amount:
- Fast — 40 ms. The curve follows every hit. Good on drums, obvious on anything sustained.
- Slow — 800 ms. The curve follows the arrangement, not the beat. Good on a mix or a pad.
- Auto — somewhere between the two depending on how sustained the material is, which keeps a pad from pumping and still lets a drum loop breathe. Start here.
The rise is 2 ms either way, so a transient always gets the firmer curve.
The monitoring
Level Match
Turn it on first. It offsets the output by what the input gain and the shaping add to pink noise at −16 dBFS RMS, so you can move Curve and Effect without the level moving with them. Without it you will choose the louder setting every time, because louder sounds better for about ten seconds.
It deliberately leaves the Output fader out of the calculation — that stays your trim.
Delta
Plays only what 23Bloom adds: the output minus the input. The fastest way to hear whether the harmonics are landing where you want them, and the fastest way to notice when they are landing on the bass.
Density
The change in crest factor, in dB, over the last third of a second. Positive means the gap between the peaks and the body has closed. It goes the other way too — a setting that shapes the bands unevenly can open that gap rather than close it — so read it rather than assuming. Which brings us to the warning.
It is not a limiter
23Bloom makes things denser and louder to the ear. It does not control peaks: nothing in it holds a transient down. If the peaks have to be held, put a limiter after it.
Solo
In Mid/Side only: plays the mid or the side on its own, so you can hear what you are doing to one half. Delta and Solo are monitoring only — neither is stored in a preset or in your session, so you cannot leave a mix soloed by accident.
Mid and side
Mid/Side gives the centre and the sides their own complete set of controls — drive, curve, effect, bands, loudness, trim. The page switch above the shaper chooses which one you are editing.
Shape the mid for density and leave the sides alone, and the centre of a mix comes forward without the width changing. Do the opposite and the sides open up while the vocal and the kick stay put. The honest caveat: on most material the sides sit about 10 dB below the mid, so shaping them gently is a level change more than a tone change. If you want to hear the sides working, drive them.
Setting it up from nothing
- Load Clean Slate and turn Level Match on.
- Raise Input until the input meter sits near the top. The curve needs signal.
- Turn Band Split on and pull the low band to zero.
- Bring Effect up to around 50 %, then move Curve until the tone is what you want — negative for body, positive for harmonics.
- Press Delta and check what you are adding. Press it again.
- Turn Level Match off and set Output so the track sits where it did.
The presets
18 of them, filed by what they are for, each with a line saying what it does.
- Starting points — Clean Slate for building from nothing, Classic Inflate for the plain curve, Gentle Lift for a small one.
- Mix bus — Bus Glue comes out at the level it went in, so what you hear when you switch it in is the weight and not the loudness. Fat & Warm and Dense Mix go further.
- Mastering — Master Polish is a quarter of a mild curve at 4× oversampling. Loud Master is for level at the end of the chain, and is the one that most needs a limiter after it.
- Drums — Drum Punch for body under the transient, Snare Crack for the ring and the room, Hard Push when you want it obvious.
- Bass — Bass Weight keeps the low end on one band so it holds its phase; Bass Grit is for a bass that has to cut through a dense mix.
- Vocals — Vocal Forward tracks the level, so louder phrases are thickened more than quiet ones. Airy Presence is softer and sits higher.
- Mid/Side — Solid Centre, Side Air and Wide & Open, which shape one half and leave the other.
Save your own beside them with the Save button. Presets you saved in Bloom import through the same browser.
Oversampling
1×, 2×, 4×, 8× or 16×, running the shaper at a higher rate so hard settings lose their aliasing rather than their tone. It costs latency — none at 1×, four samples at 2× and six above it, reported to the host — which is small enough that you can leave it at 4× while mixing. The bottom bar shows the exact figure.