How to Use Dualite: Mid/Side, Parallel Lanes and Two Chains
What mid/side actually is, when to use it instead of left/right, how to build chains in Dualite, and settings to start from on vocals, drums, bass and the mix bus.
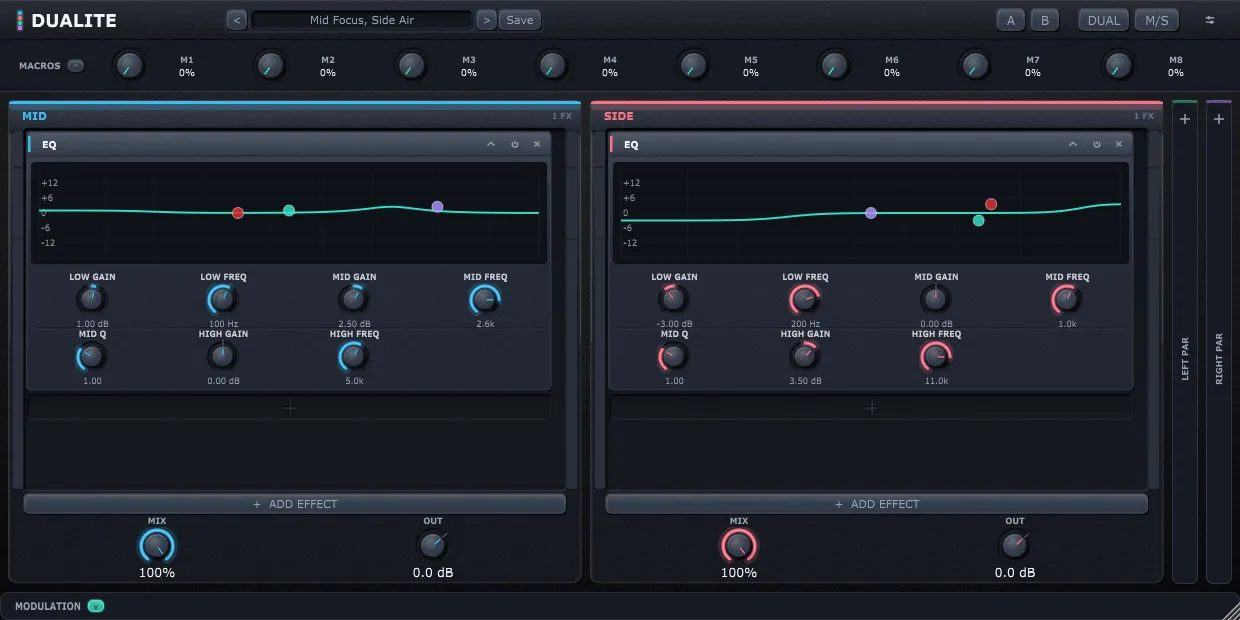
Dualite gives you two independent effect chains and one decision to make about what they contain: left and right, or mid and side. Everything else in the plugin follows from that decision, so this guide starts there — what the two modes actually are, when each one is the right answer — and then goes through building chains, the parallel lanes, modulation, and the settings I start from. The release post covers what the plugin is; this one is about using it.
Key takeaways
- Dual processes left and right. M/S processes what the channels share and what they do not. Same plugin, same controls — only what the lanes carry changes.
- Mid/side is the mode for anything already stereo: mixes, buses, room mics, wide synths. Dual is the mode for making a mono source stereo, or for treating a genuine two-track.
- The side channel is difference, not “the sides”. Anything centred is not in it at all, which is exactly why cutting there does not touch your kick.
- Start with one effect in one lane. Two chains is a lot of rope; the useful moves are small.
The one thing worth understanding
Mid is what the left and right channels have in common. Side is what they do not. Encoding is nothing more exotic than a sum and a difference, and decoding puts them back — so a chain that does nothing returns exactly what you fed it.
What matters musically is what ends up where. In almost any finished mix, the mid carries the kick, the bass, the snare and the lead vocal, because those are panned centre and therefore identical in both channels. The side carries the room, the reverb tails, the wide synths, the double-tracked guitars and the stereo overheads.
That has a consequence worth saying plainly, because it is the thing people get wrong: a centred sound is not in the side channel at all. You can cut 200 Hz out of the side by 6 dB and your kick does not move a decibel — you have only removed the mud that the room and the wide layers were contributing. This is why “high pass the sides” tightens a mix without thinning it, and why it is the first move in half the mastering chains ever written.
The reverse is just as useful. Boost 10 kHz on the side and you have added air to the room and the reverb, not to the vocal’s sibilance. One EQ across the pair cannot tell those apart. Two chains do not have to.
Dual or M/S
Use M/S when the material is already stereo and the two channels are related — a mix, a drum bus, overheads, a stereo synth patch, a room pair. You are working with the image.
Use Dual when the two channels are genuinely separate things — a two-track of two different sources, a double-tracked guitar hard-panned — or when the source is mono and you want to build a stereo image by treating the copies differently. Two different delay times, two different filter sweeps, two slightly different saturations: that is how you get width out of something that had none. Ping Pong Delay and Opposing Sweeps are both Dual presets for exactly this reason.
One caution: switching between the modes dips the output for a moment, because one set of chains cannot process both domains at once. Pick the mode before you start dialling, not in the middle of a take.
Building a chain
+ ADD EFFECT at the bottom of a lane, or the + inside it, opens the browser — search by name or by category. Drag a slot by its header to reorder it; up to eight per lane. Each slot has a collapse arrow, a bypass switch and a close button.
Order matters as much as it does on a pedalboard or in a rack. The two habits worth keeping:
- Corrective before creative. A high pass or a mud cut before the saturation, so you are not distorting the thing you were about to remove.
- Dynamics before ambience. Compress the source, then put it in a room — otherwise you are compressing the room too, and the tail pumps.
Ctrl+Z goes back sixty-four steps and covers adding, removing, moving and swapping effects, loading presets, and modulation assignments. It deliberately does not step through individual knob movements, so a long drag never buries the change you actually wanted back.
The parallel lanes
Each main lane has a parallel lane behind it, with three controls: SEND (how much goes in, tapped before the main lane’s effects), MIX (how much comes back) and OUT.
The reason to use one rather than just lowering an effect’s own mix is that the parallel lane is fed pre-effects. The dry path stays whole and untouched, and you are adding something next to it rather than diluting it. That is the difference between a compressor that squashes your drums and one that adds a squashed layer underneath them — the transients survive in the main lane while the parallel lane supplies the weight.
Three that earn their place immediately:
- Parallel compression. A hard compressor in the parallel lane, main lane empty, Mix around 40%. Parallel Crush is this, ready to go.
- Parallel saturation. Distortion is much easier to like when the clean signal is still there underneath it at full strength.
- A reverb send. Reverb in the parallel lane instead of on the source, so the dry never gets pushed back. In M/S mode, put it on the side parallel lane and the space opens around a lead that has not moved at all.
Modulation and macros
Four slots, each an LFO, an envelope follower or an ADSR. Right-click any control to assign one; you get a depth and a polarity — bipolar swings either way around where the knob currently sits, unipolar only moves in one direction.
Two things about depth are worth knowing before you get frustrated with it. Depth is a fraction of the control’s whole range, so on a filter cutoff that runs 20 Hz to 20 kHz, a depth of 0.075 is already a sweep of roughly 500 Hz to 3.5 kHz. Small numbers go a long way on wide controls. And followers and ADSRs listen at a tap point you choose — a lane’s input, or before or after any single effect in it — so you can have the compressor’s output drive a filter that sits ahead of it.
The move that only exists here: assign one source to both chains with opposite polarity. The image breathes — one side opening as the other closes — from a single LFO, and it never drifts out of phase with itself because it is one source.
Then there are eight macros, each mappable to any number of controls with its own depth, and automatable from your host under its own name. Build a chain, map the three knobs that matter to one macro, and ride that.
Where to start
None of these are presets — they are the settings I reach for, written out so you can predict what each move does before you make it.
| Job | Mode | Lane 1 | Lane 2 |
|---|---|---|---|
| Tighten a mix | M/S | Mid: nothing | Side: high pass at 120–200 Hz |
| Open a lead vocal | M/S | Mid: dry | Side parallel: reverb, Mix 30% |
| Glue a drum bus | M/S | Mid: slow compressor, 2:1 | Side: nothing |
| Control a wide synth | M/S | Mid: dry | Side: de-esser or 8 kHz shelf cut |
| Width from a mono source | Dual | Left: delay 11 ms | Right: delay 17 ms |
| Thicken a guitar | Dual | Left: light saturation | Right: same, slightly more drive |
Two rules that keep this out of trouble. Check in mono — if a move disappears or the level jumps when you collapse to mono, you have gone too far with the side channel. And make small moves: 2–3 dB in the side channel is a large change, because you are moving a signal that only exists as a difference.
The presets, and how to read them
The name in the header opens the browser, and search matches names, categories, descriptions and tags — so “snare”, “trap” or “width” all find something. The description of whatever is highlighted shows underneath, which is the fastest way to learn what the plugin can do: read what a preset claims to do, load it, and look at what the two lanes are actually holding.
If you want to understand the plugin in five minutes, open Stereo Field and step through it. Mid Focus, Side Air, Bass Mono, Sides Wide, Side Reverb Only, Mid Punch, Side Glue, De-Harsh The Sides, Haas Widener. Each one is a small, specific job that a single chain cannot do, and every one of them is two or three effects at most.
Mix Bus and Dynamics are the ones you will use most on ordinary work. Sound Design and Lo-Fi are where the granulator, the ring modulator and the frequency shifter live, and where the two chains stop being a mixing tool and start being an instrument.
What Dualite is, and why it is built around one decision, is in Two Chains, Not One.